Friday, August 30, 2013

Easy Brushed Gold Tipped Nail Tutorial

So I thought I would do a nail tutorial for you all since I haven't done anything diy / tutorial like in a while. Here is an easy up-and-coming look that anyone can do. I am seriously seeing this everywhere, but it's very easy so you won't need to take any notes.


Nail Polish/ Varnish Needed:
clear base and top coat (I used Sally Hansen's Hard as Nails Xtreme Wear)
a dark solid base color (I used ORLY's Liquid Vinyl)
a dense glittery top coat (I used Revlon's Gold Coin)


To start, paint a base coat on all of your nails and let dry and follow that up with your dark base color.


You can either clean up the edges now or wait until the completed look. Once your base coat is dry, take your glittery top coat and blot as much as you can OFF of the bush. This is used to get the 'messy' effect of the brushed-tip look.


Roll, dab and blot at the tip of your nails with the little bit of polish left on the bush at that point and do this to every nail.


To finish, bush on a clear top coat to protect your look. Now you have a really cool, edgy nail look that your friends will want to copy.

Wednesday, August 28, 2013

What I Love Wednesday 8.28.13

I cannot believe how quickly Wednesdays come and go! Here is what I am loving this week:


PicMonkey Photo Editing


Since I have moved, some of my things have obviously gotten lost in transit. This includes my Paint Shop Pro X CD which I use to edit all of my photos, and that of course includes the pictures I take for the shop that I use to advertise my items. Upon browsing several forums for which *free* photo editing website was the best, I found PicMonkey. They haven't let me down yet!


Creepy Doll Head Garland


You all remember how I said I was into creepy things? This would be one of these things. I desperately want to get one of these garlands for the Halloween party we're going to be hosting in two months, but it is soooo expensive because it is handmade. Also, it is not long enough. I am hoping that maybe I can replicate one in time. I'm just not sure where to start with this without getting the other people I would need to be involved, creeped out.

Puffy Food Stickers


What? Yes, this is what I've been spending a lot of time looking at. For a few good reasons though. I have a small Ball Jointed Doll which these would make the cutest picture stories and posters for if I used them and for resin making (I would put these inside). Needless to say I have been favoriting these left and right. They're so cute!

Gargoyles

I think that growing up with the cartoon series Gargoyles on Disney Channel as well as the animated Hunchback of Notre Dame  had something to do with my continuing fascination with these creepy creatures. I have always wanted to put them in my future garden rather than some silly little garden gnomes. Maybe Halloween will be a good excuse to invest in one then I will just casually leave him sitting outside. Heh heh.


ModCloth Lace Bowling Shirt


This final item is the one item on ModCloth I keep returning to (aside from the shoes on there, that's another story entirely). I am obsessed with the way this shirt is made. How it looks like a man's bowling league shirt, but it's lacy and feminine and fun. I may have to add it to the virtual cart of no return next payday.


That's five! I am so sorry the crafty posts have subsided! I promise I'll be posting something tomorrow!

Sunday, August 25, 2013

What I Wore Today 8.25.13


Hey guys. Here is a little review of what I wore today. It was my day off and we were going over to my parent's house for dinner. I bought some new clothes last weekend and wanted to wear them in.


As far as hair and makeup go, I did trim up the sides of my hair quite a bit (if you can tell in the first picture) and for makeup I used a few different eye shadows (along with concealer and a small bit of powder foundation. The makeup look I did is dark. The shade on the outer part of my lids is a deep burgundy/ brown color (and appears more burgundy in person) by Avon, then on the insides of my lids I used a gold eye shadow from Ulta called Copper Bronze.


Here is an overall picture of my look. I am by no means the thinnest girl around, but I don't feel like I'm very  much overweight either. I really like this top shirt I got at JCPenny's. It's sheer and has gold faceted buttons. I paired it over a black Arizona T-shirt I also got at JCPenny's because it was on sale for $4. I love how it looks like a bowler shirt. It also has a longer back/ tailing so you can pair it up with leggings or shorts.


The jeans are nothing special. In fact they are one of the only pairs of jeans I currently own. They're (overly) stretchy and pretty skinny and I got them at Ross in Las Vegas about 3 years ago when I went and ran out of clothes because we had decided to stay another day.


I got my Jeffery Campbell skull studded sandals on a flash sale on KarmaLoop (through PLNDR). They were just over $80 which is really good for Jeffery Campbell. I got them the same sale I got my UNIF Hellraisers. They're seriously cute and comfortable and better than the flip flops I usually wear all summer long.


Finally for jewelry I have on a gold wing necklace that I have had forever and don't remember where I got it. It's got small faux diamonds in it and my two macrame skull bracelets that I picked up at PacSun.


I hope you enjoyed this post. My next three posts will be a nail look, a polymer clay tutorial and WILW for this week!

Wednesday, August 21, 2013

What I Love Wednesday 8.21.13

I can't believe it's been a full week already. Ok, here goes:


ANTHONY & KALEL AND THEIR YOUTUBE CHANNEL


Most of you may recognize Anthony from SMOSH (now the second most subscribed to channel on YouTube.) About 2 years ago his girlfriend Kalel started making fashion and diy videos and I was hooked. I didn't even know she was Anthony's girlfriend until they were getting dinner one night in one of their videos and I said 'I think that guy's from SMOSH.' When Kalel figured that she wouldn't have enough time to maintain her own channel, I was a little crushed honestly, but she and Anthony made this new channel (Watch Us Live and Stuff) where they post daily vlogs, challenges and mail hauls nearly every day which makes the end of my day worth it.


MODCLOTH

I have a rapidly growing 'love it' list and rekindled love for ModCloth. They're clothes are for the most part really retro looking and they have plus sizes (I'm not plus sized, but I think that this is awesome of them, because a lot of clothing places don't offer plus sizes and I don't think that's right.) It began while I was looking for a dress to buy for this big birthday vacation Josh and I are planning next month and possibly for a wedding. Things here are a little on the expensive side, but I think most of it would be worth having


ORLY ROYAL VELVET


To be honest, this was an impulse buy at Sally's Beauty Supply. I have loved the ORLY brand of nail lacquer for a long time and have a large hoard filling a silver train case to prove it. I have applied this color twice already (instead of doing the nail tutorial I was going to do...) and I am so in love with it. It's a duo-chormatic shade of blue and purple and I love how it has the chameleon effect. I've gotten many compliments on it and this photo really does it no justice.

UNOFFICIAL HARRY POTTER KNITS MAGAZINE

Oh my gosh, can someone please buy me this magazine? I saw it at work yesterday and have been flipping through it both today and yesterday. There are so many brilliant patterns in here. There are even patterns that are Harry Potter character inspired, not just what is included in the movies. I just want to add it to my hoard, even if I'm not the best knitter yet.


SUCCAPLOKKI OWL KNITTER'S GAUGE


Is another knitting item ok, because I love this owl needle gauge. It's another Etsy find and I can honestly say that I have NEVER seen another gauge like this. This is awesome and matches everything I already own... that is owl-related. I might have a small problem. This shop also sells the needle gauges in European sizes as well as US. I may treat myself to one of these for my birthday.


...That was fast. I can't believe that's five things already! I'm off to make dinner now.

Tuesday, August 20, 2013

Indie-Go-Go Smoothie

Feeling blue or just in the mood to drink it? Here is an easy smoothie for you!


1 cup of orange juice
1 small hand full of spinach
2 small hand fulls of blueberries
8 blackberries


BLEND!


Your final result is a pretty hue of purple,which is fun to look at and fun for kids to eat!


B-B-B-Bonus tip: Fruit going bad after you've just set it out? Some fruits and veggies produce a gas called ethylene as they ripen, but this can cause other fruits to ripen faster as well. Keep your ethylene-producing fruit in a separate fruit bowl in another location. Popular examples of ethylene-producers are; bananas, melons, peaches, tomatos and avacados (among others! This is a good site to see a full list on both varieties!) Popular examples of ethylene-sensitives are; apples, watermelon, potatoes, and carrots.

Sunday, August 18, 2013

Making a Fall Burlap Wreath for Work


Recently at work I was asked to make a Fall wreath for a display at work. Now, I don't have process pictures because I made this at work and I'm not allowed to have my phone on the floor, but I will provide a list and a written process of how I made this beautiful Autumn creation. I believe you can get most of these materials at most craft retailers.

MATERIALS NEEDED:

--`// :: a grapevine wreath
--`// :: floral wire or chenille stems
--`// :: colored burlap (5 inches wide)
--`// :: assorted fall picks (I used grapevine pumpkins, fall leaves, yellow beaded sprays, and burlap sunflowers in yellow, orange and a natural color.)
--`// :: natural colored raffia
--`// :: wreath stand or hanger 
--`// :: hot glue gun

THE PROCESS:

--`// :: First of all, take your colored burlap and cut it in half. Wrap one half of the burlap around what will be the top left "corner" of your wreath. Secure the end of the burlap to what will be the back of the wreath with a small piece of floral wire or a chenille stem. Do the same to the bottom right "corner" of the wreath.
--`// :: Next arrange your floral / fall picks around your wreath in a scattered manner. I started with the leaves, then the sunflowers, the grapevine pumpkins, then finally the yellow beaded sprays. Make sure you leave the bottom right burlap covered area empty.
--`// :: Once all of your picks are where you want them to be, tie in the wire stems to secure the picks that are overlapping into the grapevine wreath and cut the backs of the sunflowers so that they are now flat and secure. Hot glue the sunflowers and anything else that seems insecure.
--`// :: Fashion a bow out of your raffia and slip a piece of floral wire into it so that you can secure it to your wreath.
--`// :: Remove all of your hot glue strings and display!

Thursday, August 15, 2013

What I Love Wednesday

First of all, I know what you're thinking, 'It's Thursday, It's Thursday,' I know, but this has been a draft since yesterday if that counts. I want to post weekly and this will be good filler for when I can't make a crafting post. I am determined to make this  a weekly Wednesday thing. So here are my top 5 loved things from this week.


FUNKO POP VINYL FIGURINES


Alright, so if you have known me a while, you know that I am actively collecting these and I have 10 on my shelf as of last night when I added Superman and Captain Jack Sparrow. The two above are the next two I'm looking to add along with oh, all of them. I just love these. They are all so cute and make any character come to life in a fun cartoon fashion.


FUNTASMA SHOES AND PUMPS


These shoes are all so gorgeous! I found them while searching for shoes for my Halloween costume (I'm going to be Bride of Frankenstein). They have so many makes and designs which range from blood splatters to Lolita-like platforms. I believe they're all costume shoes, but I would wear these every day if I never had to worry about what to wear to work. I want them all.


LEGGINGS & TIGHTS

Fall is nearly upon us and leggings are my favorite thing to wear in the fall. I say 'boo hoo' to those people who say not to wear leggings as pants because obviously they have only seen people wearing them with a shirt that's not long enough rather than a tunic or a dress. I found the pair above on Etsy and I am in love with the pattern and the colors. If you're one of these people wearing leggings/ tights wrong, correct it and try again and shame on us for making us all look bad!


SPIKY MUGS

I found these mugs on Etsy as well. I have an odd obsession with mugs, which is weird as I rarely drink coffee. However, I do enjoy a nice cup of tea and a hot chocolate once in a while. These mugs are fun and quirky and accurately expresses how I feel most mornings.


THE ROAD (movie)

My boyfriend and I purchased this film while in Colorado Springs a few weeks ago in Entertainmart. I wasn't sure what to expect as I had never seen it before, but expected great things as Viggo Mortensen is in it as the main characters and it was made from a book. This is a post-apocalyptic eye-opener and I was surprised at how much I enjoyed it. It really is a sad movie though, so don't watch it without a box of tissues with you!

I hope you enjoyed this little collection of my favorite things of the week and I like I said, I want it to be a weekly thing. See you next time!

Tuesday, August 13, 2013

SSS (Stylish Smithereens Shop) Update and Future Plans


I haven't really done anything tutorial or review related all week, but do have a nail art tutorial coming soon. I thought I'd take this opportunity to update you all on my shop and what the future holds for it.

First of all, I have been making jewelry like a fiend. I will spend my day off secluded in the craft/game room and design and create jewelry and other goodies with YouTube blasting for... hours. That's almost sad to say, but I find it nice to listen to music, watch my favorites, or learn something while my hands are busy.

Here are a few pictures of my most recent creations:

Polymer Clay Cookie Necklaces

Sailing Ship Beaded Bracelet

Caged Pearls Dangling Earrings

Elegant Lady Skeleton Cell Phone Charm Dust Plug

Beaded White Dream Catcher w/ Mixed Feathers

Various 4 Packs of Ribbon Elastic Hair Ties

These are just a few of the items I have been working on (click on the massive orange banner on the right to purchase...erm, I mean, support me!). I have other projects coming soon as well which include an upcycled military jacket, lots of knitted goodies (just in time for fall/winter!), more dream catchers, and some upcycled vintage items. I look forward to working on all of these things this month!

Saturday, August 10, 2013

Product Review: Dial A Smile's Whitening Lightening Kit


BEFORE

The title of this blog should really be 'I made funny faces all night to do a product review for you.' The product I am reviewing this time is Dial A Smile's Whitening Lightening Kit and it's kind of an ongoing solution for teeth whitening, so I'll be sharing the results of it as I continue the process. My dental history is alright. I have decently straight teeth and always have. I did have braces in my late teens / early 20s to correct an alignment issue that would eventually cause an underbite in the future. I also have a cap on my front right tooth (left in pictures, as you can see) and a few chips here and there.

I have been wanting to whiten my teeth since I got my braces off two years ago and finally had a way to obtain this kit. This kit is not cheap and originally runs for $400. Thanks to Kandee Johnson (major beauty guru on YouTube) offered a tutorial on how to do this and coupon code 'SPECIALKIT' to others looking to invest in it. With the code my price became $70 and it was a deal.


It arrived today and I was thrilled! I have been brushing, flossing and picking all week to prepare (probably overdid it a few times, but I am determined!). I opened it and it contains the following:


One circular card to show your starting point and your ending point once the treatment is complete, 3 mint finger scrubbers (not sure what to call these- you slip them on your fingers and polish your teeth before application), 3 vials of vitamin e to protect your gums, the syringe of gel, and a blue light.


Believe it or not my teeth are an 11, even though they show as being much whiter in these photographs. You can kind of tell what my level really is once I get to the gel application picture.

The first real step is to floss (as Kandee recommends). This is a good first step to take as you do not want to whiten the food particles between your teeth. I also dry brushed mine (just wet my tooth brush a little bit and brushed over them. NO toothpaste.) for good measure. 


The next step is to get out one of the finger wipes and wipe the remainder sludge from your teeth. You want to essentially clean them up a bit and dry the surface.


Immediately following this step, break open the q-tip vial of vitamin e and generously coat your gums! I cannot stress this enough right now. I missed the smallest spot around one of my teeth and when I was done and cleaned up my tooth was burning. It's still a little raw now a few hours later.

Once your teeth are all clean, your lips are sticking to them and your saliva doesn't quite know where to go, you transfer some of the gel into the cup from the syringe. Now, this said that this is good for 3 applications but it appears that I'm going to have far more gel when the time comes. I'm not sure if maybe I didn't apply enough of if I should have caked the goop on, but with the burning around that one tooth, I'm skeptical that there is any way that I did it wrong.


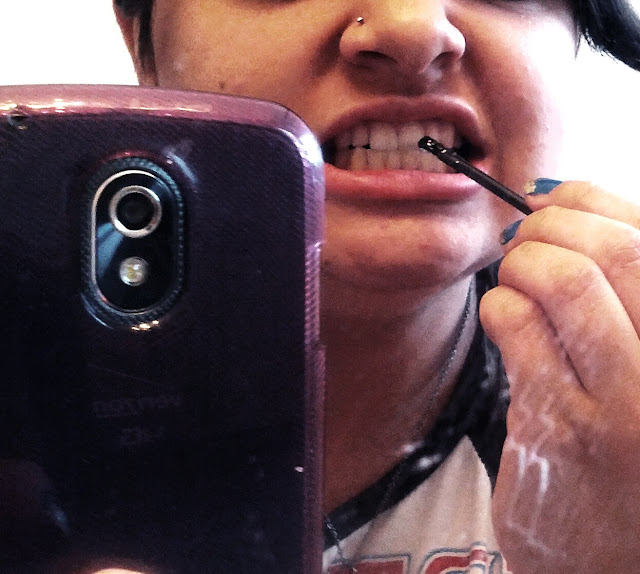
Here's how you apply the gel (it's like painting your nails [and all the little crevices too!])


Here's where you can see some true color to my teeth and the application of the gel on my teeth.


Last is the ever powerful blue light. Once the gel is applied you bite on/around this baby for 20 minutes. Since I was already on YouTube reviewing Kandee's video to make sure I wouldn't mess up and to listen to her tips, I just watched a few more of her video's and some Tyler Oakley.

(so attractive!)

AFTER

Finally I turned off the light device, spit out what I could and brushed and rinsed out my mouth. I don't really know if it made a massive impact but I am going to use my circle chart and compare again in the morning. I shall keep you updated on the whitening process as well!