Showing posts with label crafting. Show all posts

Saturday, February 15, 2014

How To: How to Make Boutique Style Ribbon Bows

Hi friends, I've been super busy lately and that would explain partially, my lack of posts. The other part is that I'm really lazy. Anyway, enough about slacking and further slacking. I have a bow tutorial for you all today!


Supplies Needed:
- grosgrain ribbon that measures 1.5 inches
- smaller ribbon to wrap around the middle (I used one that measures 3/8 inch)
- a glue gun & glue sticks
- any kind of hair barrette you want (I used a long metal barrette these long barrettes.)
- a lighter


LET'S GET STARTED!

First of all measure out and cut two 8 inch segments from your larger 1.5 inch ribbon. Heat seal your ends then fold this ribbon directly in half (do for both edges on both pieces of ribbon).


Leave a small crease in the ribbon with your nail if you are able. Then fold each end of the ribbon in to meet that middle crease.


Add a thin line of glue from your flue gun and glue and secure those ends to the middle. Do this twice with the two separate pieces of ribbon. One will be for the top of the bow and one for the bottom.


Next, fold your glued ribbon in half 'hot dog style' and hold with your fingers to create a small crease, add a small dot of glue directly in the middle of your crease and hold until dry and cool.


Next, fold the top part of the ribbon you just glued back from the dried glue and glue that portion of the ribbon to the back (on top of) the glue you just allowed to dry. Repeat for the bottom. See images if this makes no sense.


Now you are going to want to make sure everything is fluffed out the way you want the bows to look and line up the ribbons so that they are stacked upon each other. Once you are satisfied glue them into place.


Place these ribbons aside to dry and measure out your 3/8 into one 4 inch segment and one segment that is long enough to cover and slightly overlap your barrette. Heat seal all of these ends. Go ahead and glue down your shorter segment of ribbon to cover your barrette and overlap and glue your edges down to the bottom of the barrette.


Once the glue has dried, line up your barrette to the back of your bow and glue the middle and ends down to the ribbon. Now you can align the other piece of 3/8 ribbon and begin to wrap and glue it around as you go. Mainly glue down the backs and sides as necessary.


And that's it! Fluff them out and slap them on your head as a last minute accessory! Play around with different ribbons and cabochons if you are feeling adventurous. My tribal / aztec bow actually has 3 eight inch segments of ribbon and a really cute cabochon glued to the front of it.

Monday, September 2, 2013

Halloween Deco Mesh Wreath

A promise is a promise! That and the fact that I totally knew I was going to be making this today. So go to your local craft store and gather your supplies. It's time to make another wreath!


MATERIALS NEEDED:
&&;; a large floral wire wreath ring
&&;; one large roll of deco mesh and one small roll of deco mesh in a corresponding color
&&;; chenille stems or pipe cleaners in a color that will blend in to your large deco mesh roll
&&;; scissors
&&;; fall / floral picks (I used some metallic orange pumpkins from the Fall/ Seasonal department and some green and purple curly picks from the Floral department)


First you will need to cut your chenille stems into thirds. You will need to cut about 25-30 of them depending on the size of your wreath frame.


Next you will be tying these pieces of the stems to the wire. I put about 2 per segment, but I did end up adding a few more sporadically as I tied on my deco mesh, so save a few as you go along.


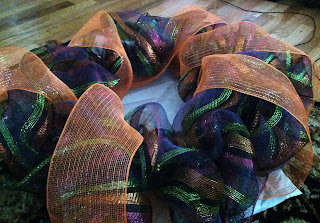
Unroll your large roll of deco mesh a little bit and fold it over and into itself so that the edges and corners will be hidden and use any one of the chenille stem segments to tie the mesh to the wire wreath frame. DO NOT be afraid to stick the stem through the holes of the the mesh. It is a very forgiving material. It is soft/ yet firm at the same time which makes it really easy to use.


Once all the edges are where you want them to be, hidden yet secure, you can start tying down the rest of the mesh. I suggest pulling and puffing little bits at a time so that you can get the volume you want all the way around. Work in small segments and secure as you go along. If you need to you can also slide your chenille stem segments around the wreath so that you can make areas of the wreath look more voluminous. Again, feel free to add in more chenille stems as you need them.


Once you are done with that kind-of time consuming process, look the wreath over, puff anything out that needs it and make your minor adjustments before adding your second roll of mesh.


Unroll that second roll of mesh and secure one end of the mesh to the back side of your wreath. Loop, wrap and secure the mesh as you go along. you can puff it like you did with the first roll of mesh of you can kind of wrap and secure like I did:


If you have extra mesh from the second roll, cut it off and make a bow (that's a tutorial for another time! Shoot your browser on over to YouTube if you need to know how to do this now! I'll try to make one around Christmas time).


Once the bow is secure (use more chenille stems to secure it!) It's time to decorate. Picks are easy to use because you can weave the stick/wire piece around the wire wreath and they are usually pretty secure on their own.


Once everything is where you like it, slap a wreath holder on your door and put that bad boy up to proudly display. I may need to add a few more pumpkins to mine, but I am very happy with how it turned out!