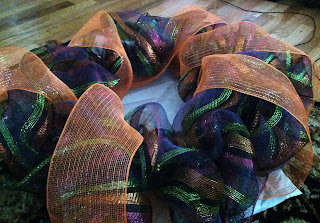
A promise is a promise! That and the fact that I totally knew I was going to be making this today. So go to your local craft store and gather your supplies. It's time to make another wreath!
MATERIALS NEEDED:
&&;; a large floral wire wreath ring
&&;; one large roll of deco mesh and one small roll of deco mesh in a corresponding color
&&;; chenille stems or pipe cleaners in a color that will blend in to your large deco mesh roll
&&;; scissors
&&;; fall / floral picks (I used some metallic orange pumpkins from the Fall/ Seasonal department and some green and purple curly picks from the Floral department)
First you will need to cut your chenille stems into thirds. You will need to cut about 25-30 of them depending on the size of your wreath frame.
Next you will be tying these pieces of the stems to the wire. I put about 2 per segment, but I did end up adding a few more sporadically as I tied on my deco mesh, so save a few as you go along.
Unroll your large roll of deco mesh a little bit and fold it over and into itself so that the edges and corners will be hidden and use any one of the chenille stem segments to tie the mesh to the wire wreath frame. DO NOT be afraid to stick the stem through the holes of the the mesh. It is a very forgiving material. It is soft/ yet firm at the same time which makes it really easy to use.
Once all the edges are where you want them to be, hidden yet secure, you can start tying down the rest of the mesh. I suggest pulling and puffing little bits at a time so that you can get the volume you want all the way around. Work in small segments and secure as you go along. If you need to you can also slide your chenille stem segments around the wreath so that you can make areas of the wreath look more voluminous. Again, feel free to add in more chenille stems as you need them.
Once you are done with that kind-of time consuming process, look the wreath over, puff anything out that needs it and make your minor adjustments before adding your second roll of mesh.
Unroll that second roll of mesh and secure one end of the mesh to the back side of your wreath. Loop, wrap and secure the mesh as you go along. you can puff it like you did with the first roll of mesh of you can kind of wrap and secure like I did:
If you have extra mesh from the second roll, cut it off and make a bow (that's a tutorial for another time! Shoot your browser on over to YouTube if you need to know how to do this now! I'll try to make one around Christmas time).
Once the bow is secure (use more chenille stems to secure it!) It's time to decorate. Picks are easy to use because you can weave the stick/wire piece around the wire wreath and they are usually pretty secure on their own.
Once everything is where you like it, slap a wreath holder on your door and put that bad boy up to proudly display. I may need to add a few more pumpkins to mine, but I am very happy with how it turned out!


